C3 Build Sheet Recovery
Removing the gas tank on a C3.
BY: Chris (Vettefinders.com)
Removing the fuel tank on a 1968-1982 Corvette will take approximately 1-2 hours. Be sure to wear safety goggles and disconnect your battery during this process. The first step is to drain the fuel tank, usually with a mechanical syphon. The next step is to block the front wheels and raise the rear end of the car. Be sure to place jack stands under the frame.
Next, unbolt the rear most muffler hangers and loosen the muffler clamps next to the half-shafts. This will allow you to push the mufflers out of the way of the spare tire holder and the gas tank. Remove the spare tire. Remove the spare tire holder by removing the long mounting bolts with a crescent wrench.
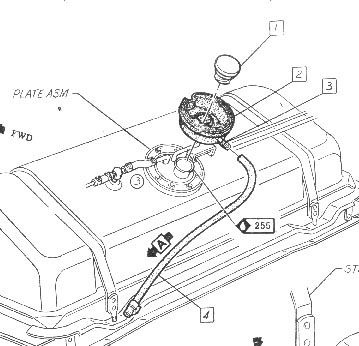
Next, you will need to prepare the gas tank for lowering. Remove the rubber gas filler neck. Remove the gas gauge electic lines. There are two wires for this on the right side of the filler. You will most likely be able to see the three lines that run to the tank, after you have removed the filler neck. The two gas lines are located on the right side, and the evaporator line is located on the left. It will be easier to remove these lines after lowering the gas tank a few inches. If you are going to re-use these lines (which you will, unless you are doing a frame-off restoration), you must be careful not to bend or break these lines.
Next, remove the two nuts from the gas tank straps that hold the gas tank to the mounting cross member. Place a floor jack below the tank with a 2x4 across the jack. Jack the floor jack up to rest against the bottom of the tank. Before you proceed, REMEMBER, you still have the 3 fuel lines attached, and you only want to lower the tak a few inches! Remove the bolts holding the tank in place and lower the tank a few inches. Now you should be able to get your hand in from the filler area to pull the fuel and evaporator lines loose from the tank. Also, now is a good time to check for your build sheet. If the sheet happens to be glued to the tank AND one of the straps, it will begin to tear if you lower the tank further. Check to see if you can locate the build sheet. It is usually located on the upper front side of the fuel tank on the driver's side of the car.
If everything looks good, lower the tank to the floor. You tank is now separated from the car. If you have managed to recover your build sheet, be very careful to handle it gently. Do not brush at the paper, because this will only cause further deterioration.
While your tank is out, you may wish to restore the tank using Eastwood's zinc silver tank tone on the outside and gas tank sealer inside. Also, inspect your anti-squeak pads to determine if they need to be replaced. You should also replace the rubber lines that connect to the steel fuel lines.
Return to Corvette 101