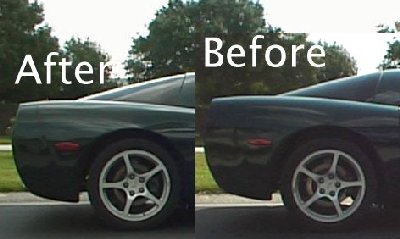
Lowering a C5
Better Looks, Better Handling.
BY: Chris (VetteFinders.com)
The C-5 suspension system is adjusted by the factory to the specifications that most street drivers would be comfortable with. Some C-5 owners don't like the appearance of the large gap between the tires and the car. Others want the improved handling that a lowered C-5 provides.
There are two approaches to lowering the C-5. You can either lower the car approximately 3/4 to 1 inch all around with out cutting any bushings or installing any new suspension items, OR you can cut the bushings, install new springs, etc. I do not suggest cutting the bushings. I do not persoanlly like the idea of performing a suspension change for the sake of looks when it includes compromising safety, therefore, I would only use the adjustment method. Warning: you will need to get your Corvette re-aligned after this proceedure.
Here, we will cover how to lower the C- 5 approximately one inch from the height the car was delivered from the dealer. You will need a 10 millimeter socket and box end wrench and an 18 millimeter socket and a 13/16 box end wrench or deep-socket, and a torque wrench (for front lug nuts).
REAR
First, block the front tires. Use a floor jack to raise the rear end of the car. (See "How to Jack a C5) Then place jackstands under the rear support. Locate the bolts located at the ends of the fiberglass spring and place the 13/16 wrench on the top of the bolt and the socket on the bottom.
Loosen the bolt until approximately 2 threads are left showing on the top of the bolt. Do this to both sides. There is a clip on the top of the bolt, so do not worry about the nut coming off.
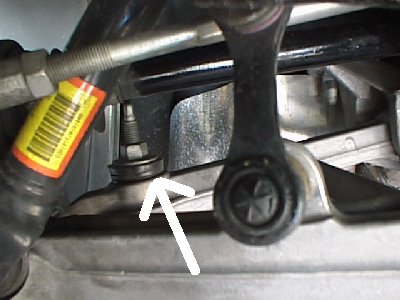
Front
You will need to remove the front wheels for adequate access to the front adjustment bolt. You may be able to get to it without removing the wheels, but it will be very difficult. Block the rear wheels, jack up one side of the front of the car and place a jackstand under the front crossmember. Remove the wheel.
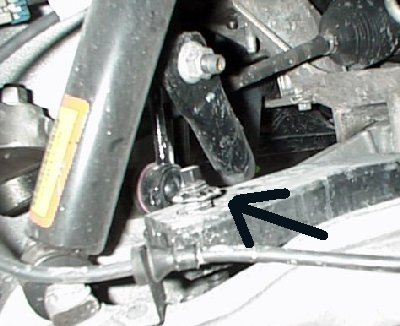
You will see a 10 mm bolt, that is only accessible from the top. Turn the bolt COUNTERCLOCKWISE (as if you were loosening it). This bolt is counter threaded. If you are using a 3/8 inch drive and a socket, you will not be able to adjust it the whole way down and still be able to remove the socket. The shock will be in the way. You will need to use an open end wrench for the last part of the adjustment. You can put your finger under the a-arm to feel the gap in the bushing decrease as you adjust. You should not run the bolt the entire way to the bottom, or you will end up with a very harsh ride. Replace the wheel, retorque the wheels to 100 lb/ft. and do the same proceedure on the other side.
For questions or comments about this article, drop Chris a line at chrisg@VetteFinders.com .
Return to Corvette 101